 Nileva

A Shopify wholesale registration form lets a business apply for a trade account, gives you the details you need to vet it, and turns an approved applicant into a buyer who sees wholesale prices. This guide compares Shopify's own company account requests with an app form, lists the fields worth asking for, explains the three ways a buyer can register, and walks through manual review, auto-approve and what happens after you click Approve.
It is for stores that sell to resellers, salons, cafés or distributors and want to know who a buyer is before showing them trade prices.
Key takeaways
- Shopify's company account requests run on the Shopify Forms app and hold each new company as "Ordering not approved" until you approve it.
- An app registration form can approve a buyer straight into a customer group, whose tag then unlocks that group's prices.
- Built-in fields work on every plan of the app; custom fields and file uploads for licenses are on the Advanced plan.
- Auto-approve suits open trade accounts; keep manual review when you vet every buyer.
- A rejected applicant gets a secure link to fix the application and send it again.
Why wholesale stores ask buyers to apply
Trade prices are a commitment. A wholesale price assumes the buyer resells, orders in volume or runs a business you want to supply, and a registration step lets you check that before the price appears. It also gives you one place to collect what you would otherwise chase by email: a tax number, a business address, a reseller license.
The second reason is control over who sees what. When approval is what grants the price, your retail shoppers keep seeing retail, and a buyer moves to trade terms only when you, or a rule you set, says so.
Shopify's native option: company account requests
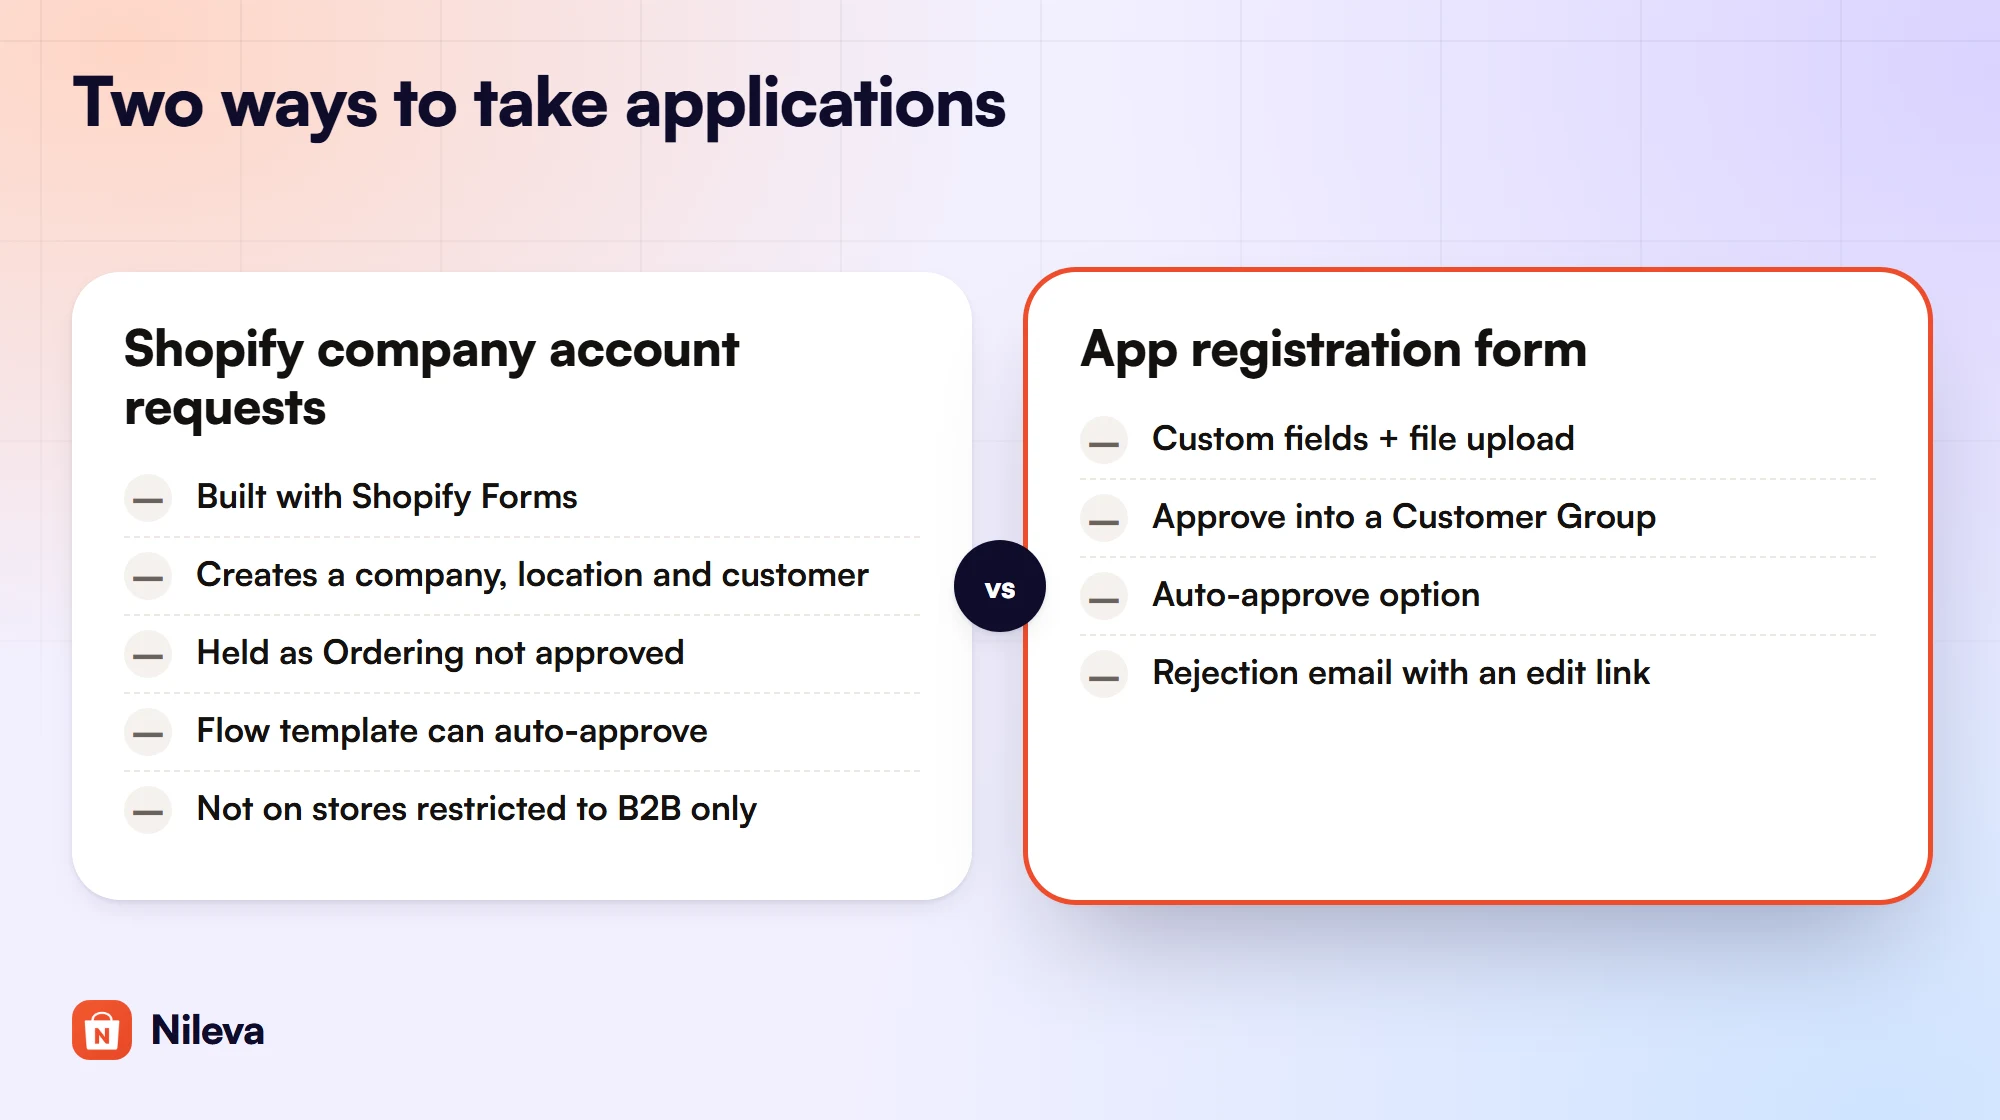
Shopify has its own route for this, called company account requests (Shopify Help: company account requests). You build a popup or inline form with the Shopify Forms app and add it to your store. Company name and email are required; you can add other company and customer fields and custom inputs, including file uploads.
Each submission creates a company, a company location and a linked customer in your admin. The new company is not approved: it can't order or see B2B pricing, and it waits under the Ordering not approved tab in Customers → Companies. To approve it, you open the company, click Manage permissions, assign locations and permissions, and confirm. To reject a request, you delete the company. A Shopify Flow template, "Allow ordering for companies created by company account requests", approves every submission automatically if you want that.
The limits to know before you choose it:
- It can't be used on a store that is restricted to B2B customers only.
- A submission always creates a new company; it can't add a person to an existing company.
- An approved company gets its prices from Shopify's B2B catalogs, which have their own plan limits (see customer-specific pricing for the catalog rules).
If your trade buyers are already companies in Shopify B2B, this flow fits them. If you price by customer tag or group, or you want applicants to join a company that already buys from you, an app form fits better. The table sets the two side by side.
| What you need | Shopify company account requests | App registration form |
|---|---|---|
| What a submission creates | A company, a location and a customer, held as "Ordering not approved" | A Pending application; the customer and tag come on approval |
| How you approve | Manage permissions on the company; delete it to reject | Approve, optionally picking a Customer Group; Reject with a note |
| Automatic approval | A Shopify Flow template | The Auto-approve new submissions setting, with an optional group |
| Join a company that already exists | Not supported | Join company mode, through an invite link |
| Custom fields and files | Custom inputs, file uploads up to 20 MB | Custom fields on Advanced; files 1 to 5 MB in six formats |
| What unlocks the price | Shopify's B2B catalogs for that company | The group's customer tag, used by pricing rules |
How a Shopify wholesale registration form works
With B2B Wholesale Pricing, the registration form is a block on a page of your store, and it is part of every plan, Free included. The flow is the same whatever you ask on the form:
- The buyer fills in the form on your storefront.
- The submission is saved as Pending and you get an email.
- You open it in the app's Registration page and review it.
- Approve: the buyer gets the group's tag, joins the group and receives a welcome email.
- Reject: the buyer gets an email with a secure edit link. Their answers are filled in, they correct what you asked for, and the application returns to Pending.
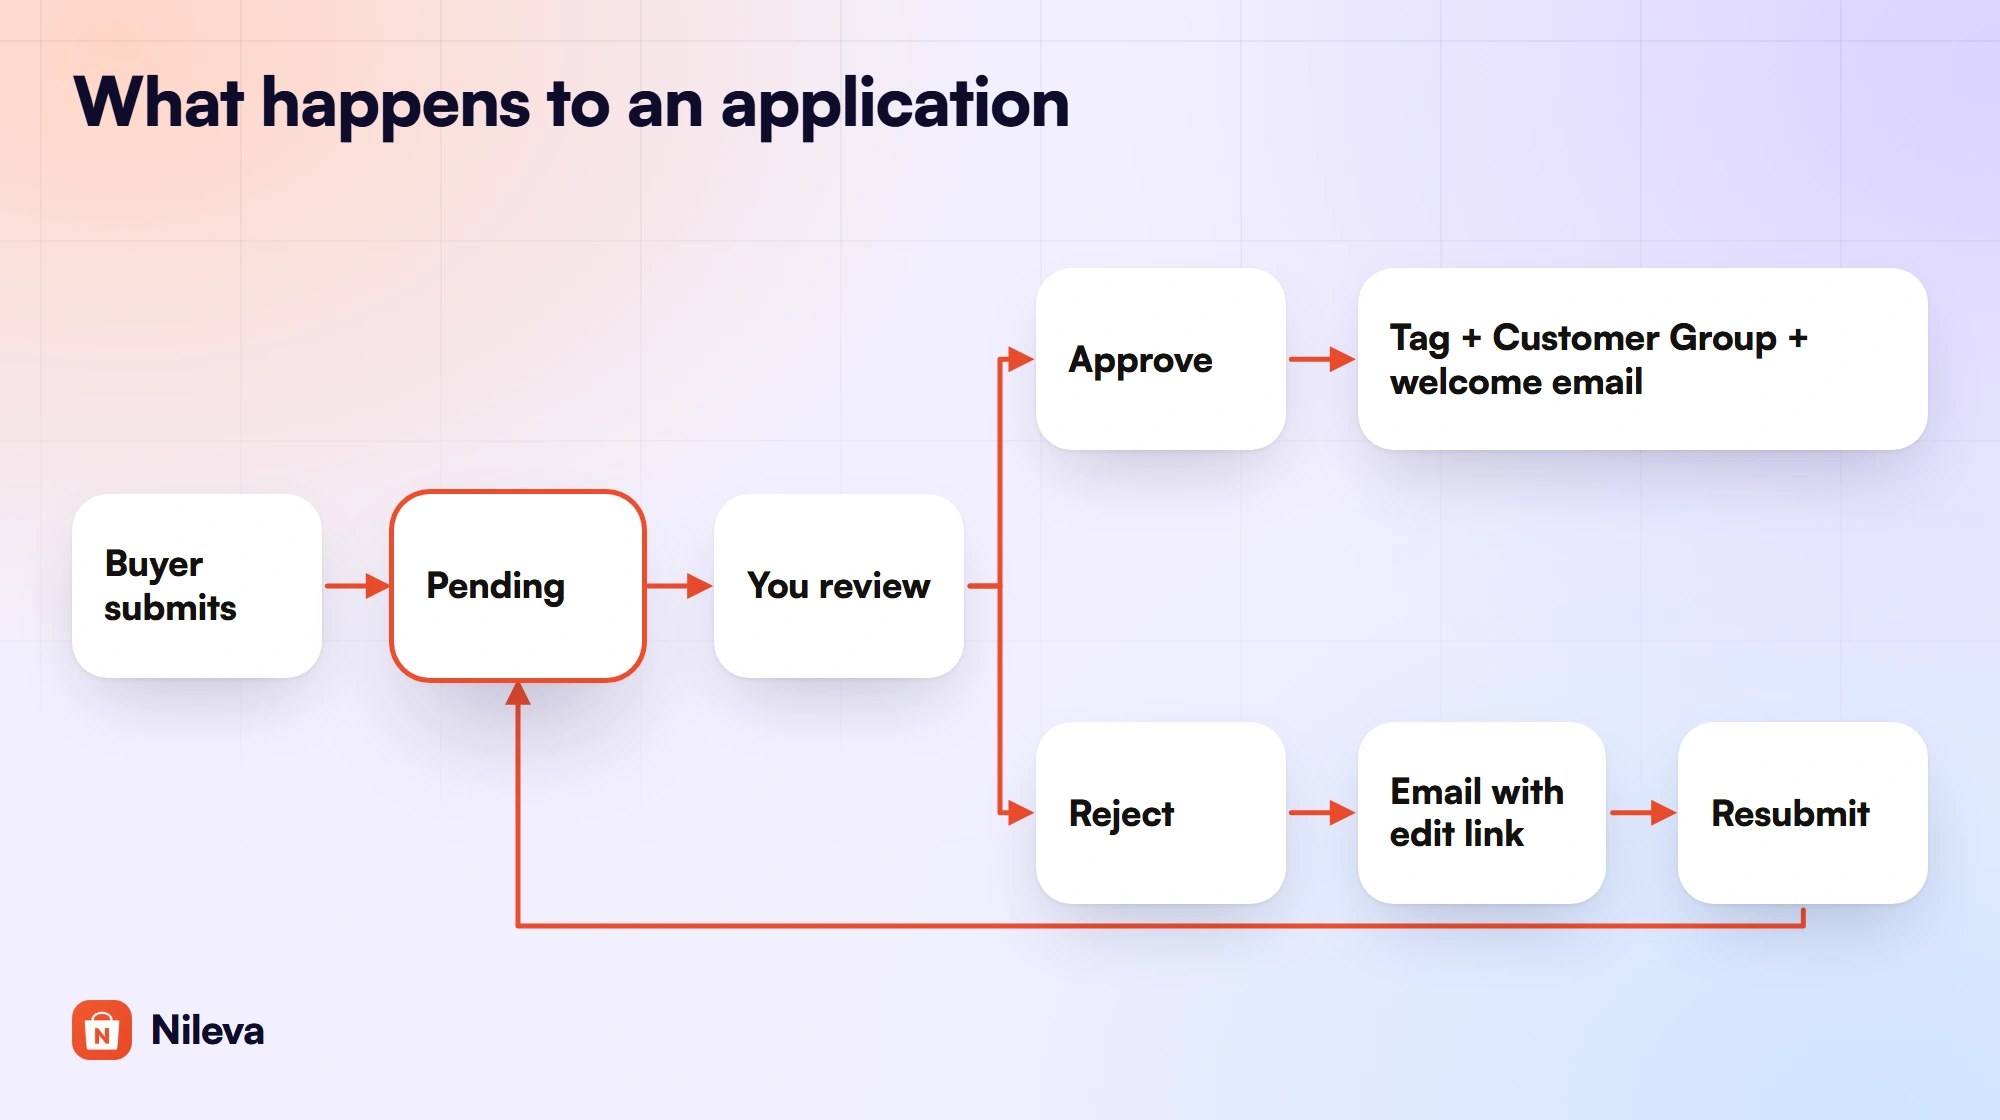
The edit link matters more than it looks. Without it, a buyer who left out a tax number has to start again, and you end up matching two applications from the same business by hand.
Which fields to ask for
Ask for what you will actually check, and nothing more: every extra required field is one more reason to abandon the form. The app's built-in fields cover the basics (name, email, phone, Tax ID, address, website, message and more) and work on every plan. You can show or hide each one, make it required or optional, set it to full or half width, change its label per language and drag it into order. Built-in fields can't be deleted or change type.
Custom fields need the Advanced plan. The types are Text, Textarea, Number, Dropdown, Radio, Checkbox, Checkbox group, Date and File upload (custom fields and file upload). A Number field can carry a minimum, maximum and step, and the form explains the limit to the buyer before they press Submit. A Date field can have an earliest and latest date.
| Field | Why you ask | Built-in or custom |
|---|---|---|
| First name, last name, email, phone | To contact the applicant | Built-in |
| Tax ID | Resale or VAT status | Built-in (Individual mode, and in the Company section) |
| Address | Shipping and tax region | Built-in |
| Company name and address | For "A company" mode | Built-in (Company section) |
| Business type | To sort applicants | Custom: Dropdown or Radio (Advanced) |
| Expected order size | To place the buyer in a tier | Custom: Number (Advanced) |
| Reseller license or certificate | Proof of trade status | Custom: File upload (Advanced) |
| Terms agreement | Consent to your trade terms | Custom: Checkbox (Advanced) |
Answers to custom fields are saved on the submission and shown when you review it. They are not written onto the Shopify customer record, so keep anything you need later in your own records too.
Collecting licenses and certificates
A File upload field takes PNG, JPG, PDF, Word (DOCX), CSV and Excel (XLSX). You can untick types you don't want, set the maximum size from 1 to 5 MB, and allow more than one file. The file goes straight to your store's Shopify Files (Content → Files in Shopify admin), and the type and size limits are checked on the server, so a browser can't get around them. In the submission, each file appears as a link you can open while you decide.
Two practical notes from the app's changelog. Fillable PDF forms, such as W-9s and resale or exemption certificates, upload normally. Some phone photos are refused, because certain camera modes store a short video inside the JPG; if a buyer hits that, ask them for a screenshot or a plain photo of the document.
Individual, company or join an existing company
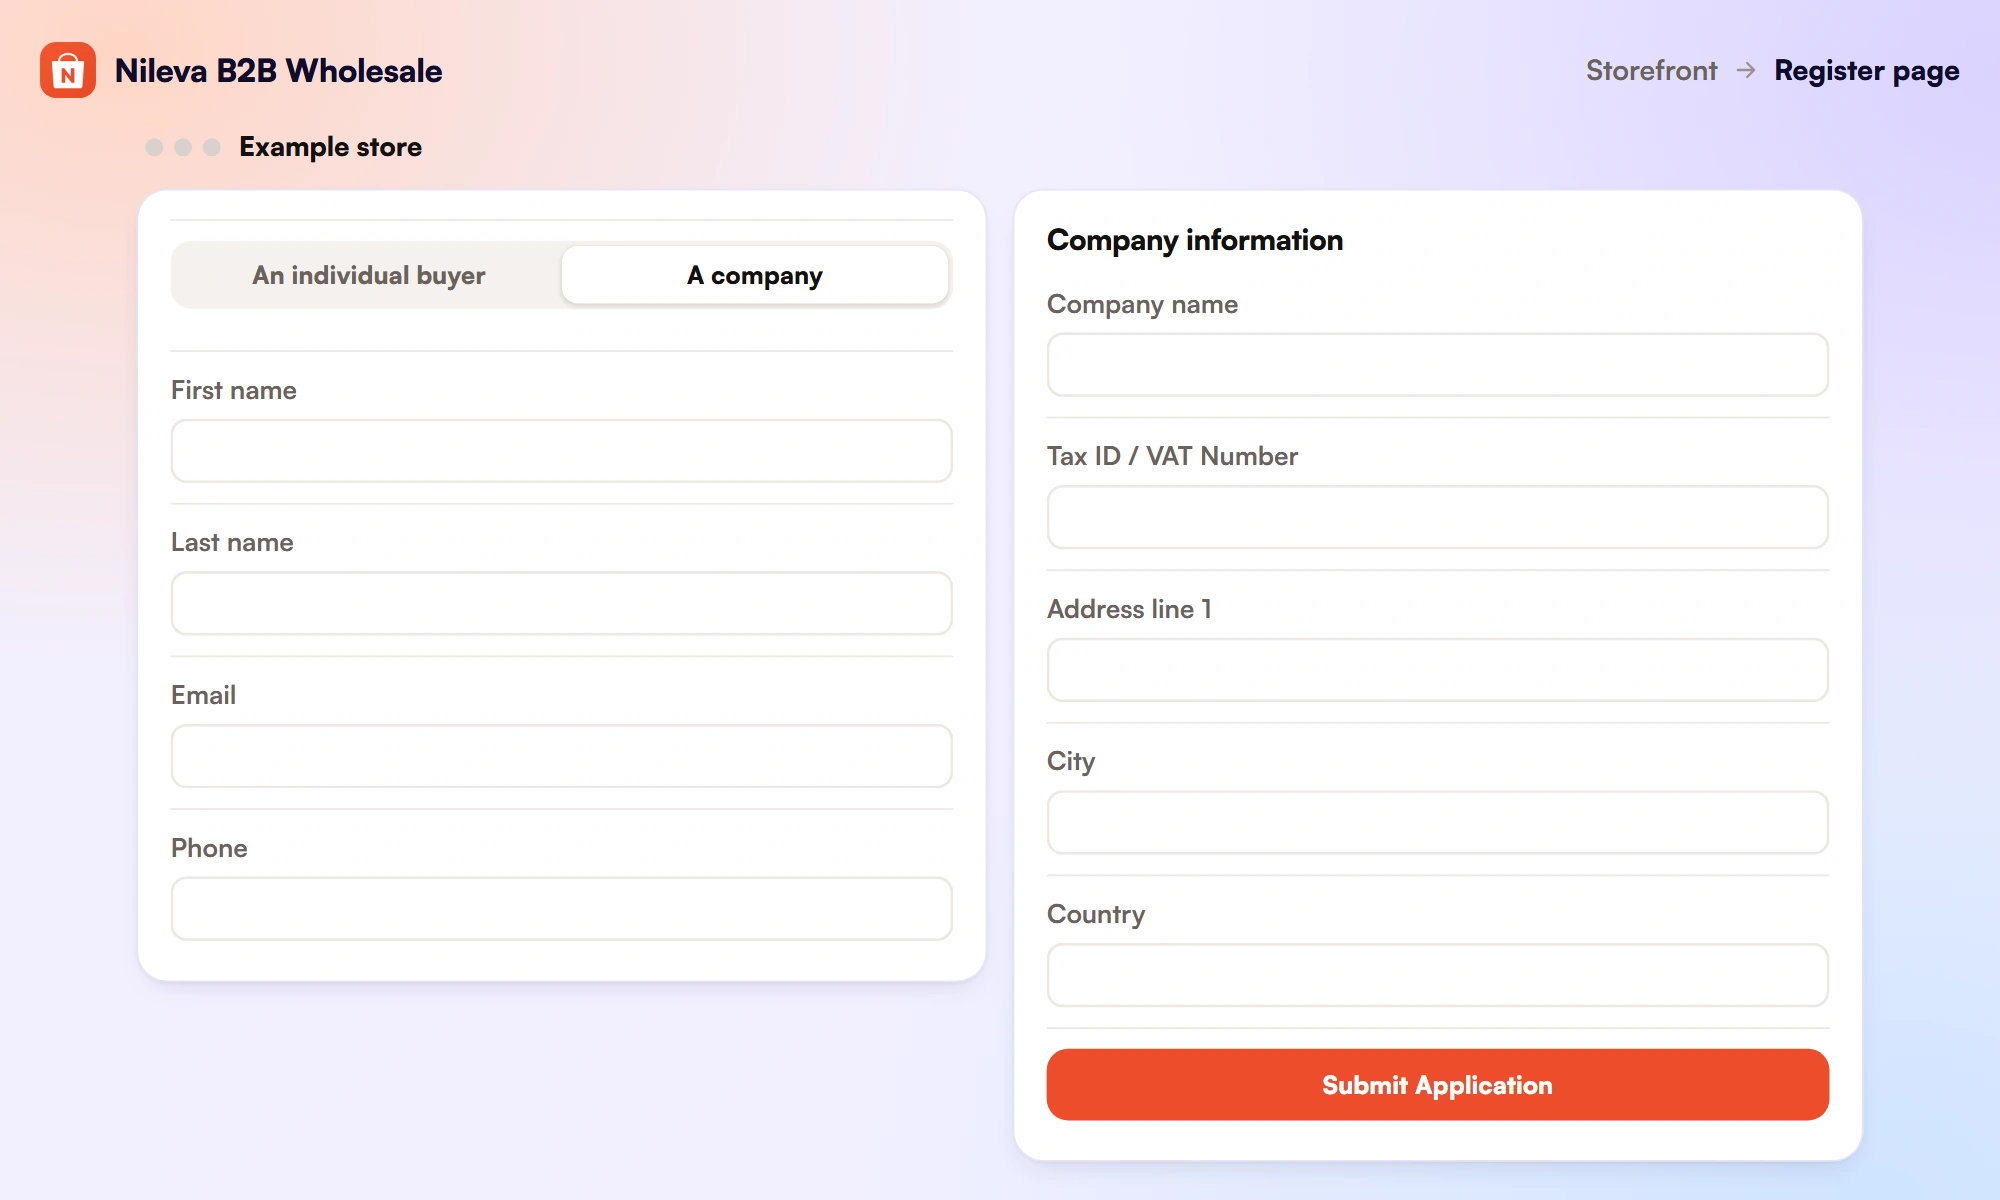
The form supports three registration modes (registration modes). The buyer picks between "An individual buyer" and "A company" with a toggle at the top, and the form swaps the fields so nobody types the same address twice.
| Mode | Started by | The applicant fills in | On approval |
|---|---|---|---|
| Individual buyer | The default choice | Personal info, Tax ID, address | A Shopify customer, plus a tier tag if you pick one |
| A company | Picking "A company" | Personal info and the Company information section | A customer and a Company record in the app, with them as first contact |
| Join company | An invite link ?company=<slug> | Personal info only | Added as a contact, inheriting the company's tier tag |
The Join mode solves a common problem: a second buyer from a business you already supply. Each company record in the app has its own invite link. When someone opens it, the toggle is hidden, a banner names the company they are joining, and they fill in only their own details, because the company's tax and address details are already on file. When you approve a company application, the buyer also gets an email with that invite link to pass on to their team.
Manual review or auto-approve
Manual review is the default, and it is the right choice when you sell to vetted resellers only: you read each application, open the files, and approve or reject. Auto-approve is for open trade accounts, where anyone who registers may buy at the trade price and the form mainly collects details.
To turn it on, go to Registration → Settings, switch on Auto-approve new submissions, optionally pick the Customer Group new buyers join, and save (auto-approve settings). From then on each submission is approved at once: the app creates or updates the Shopify customer, assigns the group and its tag, and sends an auto-approved welcome email. Turning it off later sends new submissions back to the Pending queue and leaves buyers you already approved as they are.
If you auto-approve, point the default group at your entry tier rather than your best one. You can move a buyer up by hand later; moving one down after they have seen the lower price is a harder conversation.
What happens after approval
When you approve an application, with or without auto-approve:
- A Shopify customer account is created if the buyer doesn't have one yet.
- The tag of the group you picked is added to their account, and an approval email goes out.
- Rules that target that tag apply when the buyer next loads a page, so they see their prices as soon as they sign in.
The tag only gives a price if a rule targets it. Pricing by customer tag or group starts on the app's Essential plan; our guide on how to price by customer group covers building the tiers. If you want guests to see no trade price at all until they are approved, Catalog Visibility (Advanced) can hide prices until approved for everyone outside your chosen groups.
For a buyer who registered as "A company", the app creates a Company record in the app, with them as the first contact. It is the app's own record, not a Shopify B2B company; you can assign it a Customer Group so every contact gets the tier's tag. More on that structure in our article on company accounts.
A Tax ID on the form can feed tax exemptions too. On the Platinum plan, when an application with a Tax ID is approved, the buyer appears in Tax-exempt customers as a Pending row, and EU VAT numbers are checked against VIES in the background. Rows from the form start as EU reverse charge for an EU VAT number and as Blanket otherwise; change the type before you approve that row if, say, a US reseller needs Resale. Join company applications collect no Tax ID, so they create no row. The details are in our guide to tax-exempt buyers.
Every approved buyer also appears in the Registration page's All customers view, with their tier and company, next to buyers you added by hand.
Add the form to your store
The form is an app block, so no theme code changes (add the form to your store):
- In Shopify admin, go to Online Store → Pages and create a page, for example "Wholesale Application".
- Go to Online Store → Themes → Customize, choose the Pages template and switch to that page.
- Add the Register Form block (under Apps) and save.
- Link the page from your menu in Online Store → Navigation, or from a button on your homepage.
You can put the block on more than one page, for example one for domestic buyers and one for international buyers. Before you announce it, submit the form once as a test customer: you should receive the notification email and see the application in the app. The registration overview lists every related setting, including the emails, which use your own templates.
Frequently asked questions
Does Shopify have a wholesale registration form?
Shopify has company account requests, built with the Shopify Forms app. Each submission creates a company held as "Ordering not approved" until you approve it, and it can't be used on a store restricted to B2B customers only.
Can I approve wholesale customers automatically?
Yes. Turn on Auto-approve new submissions and pick the Customer Group new buyers join. Each buyer is approved at once and gets an auto-approved welcome email.
Can applicants upload a resale certificate?
Yes. A File upload field takes PNG, JPG, PDF, DOCX, CSV or XLSX files up to 5 MB, stored in your Shopify Files. Custom fields such as this need the Advanced plan.
What happens when I reject an application?
The applicant gets an email with a secure link to edit and resubmit, with their earlier answers filled in. The resubmitted application returns to Pending.
Do approved buyers see wholesale prices right away?
Yes, once a pricing rule targets their group's tag, which needs the Essential plan or higher. Approval applies the tag, and the matching prices show when the buyer next loads a page while signed in.
Try it
Take wholesale applications and approve buyers into a customer group, free to start.


